
The New Ovens
One of our big projects for this fall is our kitchen remodel. We have been replacing all the ancient appliances with modern stainless steel units, and this past weekend we got to the biggest and most challenging install: the ovens. Yes ovens as in “plural form of oven”. Why have one when you can have two at twice the price? Actually there are some pretty good reasons to install two ovens, and I’m glad we did it. For one thing, you can cook twice as many tater tots at once.
Read the rest of this posting for pictures and the full story…
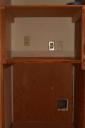
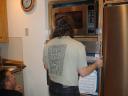
 The first thing we had to do was get the old oven removed. It wound up being rather a chore. Here is what it looked like before we began the process of removing it. It is a GE unit that runs on 220V. In the process of removing it I discovered two disquieting things: (1) its power supply line was aluminum, which has been implicated in some house fires and (2) the oven and the old electric cooktop were actually on the same branch circuit. Not good.
 After some consultation with smart electricians (thank you Donna!), I decided to remove the aluminum wiring and replace it with appropriate copper wiring, and to run a new dedicated 20A circuit for each of the the 2 new ovens. New circuits meant spending some time in the attic, which I never enjoy. I wrestled the old aluminum line out of the kitchen ceiling and studs, which was enormously challenging. Then I pulled copper lines in place of them. The final part was installing the new breakers.
 Back to the woodwork. The cabinet space had been custom built around the old 27″ wide oven. We had measured the available space and determined there was sufficient room to install a 30″ wide oven… with a bit of carpentry. And so began the carpentry. My first task was to pull out the upper shelf and remove the oak trim surrounding the front. With that out of the way I could work on pulling out the plywood on the left and right sides to make room for the new oven.
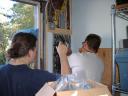
 There is something therapeutic about the demolition stage of any project. It usually involves a lot of pounding, sawing, clobbering, and other stuff. In order to widen the cabinet to fit the new oven, I did a bit of all those things. Part of the challenge with this stage was that the original construction involved the liberal use of nails, screws, construction adhesives, and staples. There was a lot of (mostly) careful work involved.
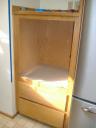
 Once the cabinet demolition was completed, we spent some time carefully measuring the space and rebuilding it fit our new ovens. The upper oven needed a new shelf and had to be custom-fit to allow the stainless steen trim kit to be assembled around it. One of the annoying aspects of this construction was the discovery that the wall on the left side of the oven isn’t plumb. I had to do a bit of adjusting to get the shelves to be level. But then I discovered that level wasn’t really what I wanted, since it had to look right in that space. Fooey… a few shims later, and everything was in place.
 Ovens are big, heavy things. When they’re clad in stainless steel, they’re all the more heavy. Putting it into the new space was a tight squeeze and required the clever application of force. In other words, I had to push it really hard. After much grunting and wiggling, it slid perfectly into place and sat gleaming happily at us. The upper oven was a little easier to install since it is basically a microwave / convection that is surrounded by a custom stainless steel trim kit. Once it was situated on the shelf we simply assembled the outer trim.
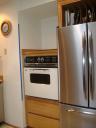
 And here is it all finished. There is still a bit of trim work to complete around the edges, but both ovens are installed and working. I’m pretty satisfied with the outcome of the project and there is always satisfaction in knowing that we did it ourselves.
Wow! Looks great John! I know it was a real challenge to get the wiring “just right”, but I think you’ll be glad you did. It’s a very nice upgrade to the kitchen – I can’t wait to try the tater tots!
The new ovens are really cool. We were just discussing how we need to make it to Seattle as we haven’t even seen your new house and titus has never been to seattle at all. Glad you have enough oven space to cook us lots of tater tots Napoleon.