 On Saturday 6/18 The Dudley Manlove Quartet played at the Sunset Tavern in Ballard. Our keyboard player Chris Joss opened the show with his accordion stylings, much to the enjoyment of the appreciative audience. We hit the stage and kicked into our regular set. We had a fantastically great show and the sold-out room was enthusiastically dancing all night. I had two minor gear gripes…
Gear gripe #1: My Fender Twin has been acting up for a while, to the point where I’ve become suspicious of its reliability. I actually brought my Fender Hot Rod Deluxe as a backup amp, and parked it onstage where I could easily get to it in the event of a problem. During the soundcheck the Twin seemed OK despite making some odd crackling sounds, but once we got into the full set the amp suddenly dropped about 50% in volume. I unplugged from the reverb channel and went into the other one, which at least had normal volume despite making some crackles and odd distortion. It did get me through the night, but that amp is headed back to the shop (again) to see if we can’t get it working happily. I’ve had these symptoms from the Twin since I bought it and it’s been in three different repair shops, all without any success at diagnosing the issue. The issue seems to be something very difficult to isolate, likely a circuit board issue. I’m working to convince my amp technician that we should simply pull out all the circuit boards and replace them with a hand-wired point-to-point turret board. This essentially would turn my 1965 Twin Reverb Reissue into an actual 1965 circuit. It would be a serious effort but I think the project would be fun and the outcome would be wonderful.
Gear gripe #2: My newly rebuilt pedalboard was perfectly behaved at the gig and I’m really happy with the way it sounds. My gripe is actually a little silly, but it’s for real. A few of my pedals have intensely bright blue LEDs on them, and since my corner of the stage is especially dark, it’s tough to see where things are on the board with those blinding blue lights in my eyes. I fumbled around in the dark trying to find some of the pedals and eventually gave up and just felt around with my hands to turn things off. The solution would be just to have a little light on my side of the stage (seriously… there isn’t a single light pointing in that direction) or to have some light at my feet.
All in all, a fun show! It’s a blast to see so many familiar faces at these local shows. Thanks to everyone who showed up.
This weekend I completed the layout and wiring for the latest incarnation of my guitar pedalboard. This project was brought to you by the letters PT and the number 3. As in PT-3. I’ve been using PedalTrain boards for years, and despite my best efforts to cram my pedals onto them, they’ve always had sizes that were a little too big or a little too small. The PT-3 is their latest release (I actually ordered mine a few weeks before they even showed up in dealer stock!) and it’s a good size for my needs. Laying out the pedals is always a tricky thing. I spent a few hours playing with the online
pedalboard planner tool to get a basic idea of how to make things work. Once I had the board on the workbench I discovered that I could move some of the pedals around to minimize interference among the connectors. I generally use George L cable and connectors which are solderless, but a few of the pedals are such a tight fit that I had to solder Switchcraft right-angle connectors onto the cables. It took about six hours of work to build the custom switch interface, place all the pedals, and wire up the harnesses for the entire board. Of course, it didn’t work when I first plugged it in! I had one Switchcraft connector that seemed to have a bad internal connection for the tip, so I just threw out the cable and made another. Now that it’s completed and ready for action, I have some programming ahead of me in advance of
this weekend’s DMQ gig. I’m looking forward to hitting the stage and putting this board through its paces!
Here’s a list of the ingredients on this latest board:
Platform
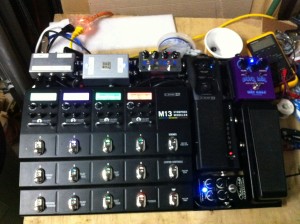
- PedalTrain PT-3. PedalTrain makes very sturdy welded aluminum pedalboards, available in several sizes. This one is 16 x 24 and fits perfectly into the hard case that came with my PT-2. The extra real estate on this board allowed me to put several favorite pedals back into play.
Gizmo Inventory
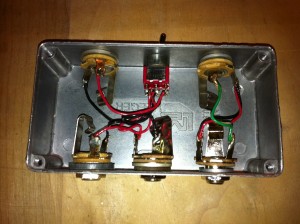
- Custom switch interface. This box has two primary functions (1) it switches between the wired and wireless guitar inputs (2) it moves the wired guitar input and signal output to the back left corner of the pedalboard for ease of patching onstage. This is a gizmo I built from a pedal-sized aluminum box and some quality time with the drill press and soldering iron.
- Line6 G50 Wireless System. I’ve used several wireless systems over the years. The Line6 Relay wireless systems are the best I’ve ever tried.
- Road Rage dual channel buffer. Road Rage sells prebuilt and kit versions of several useful pedals including custom loop switchers. Their signal buffers are very clean and allow me to run a long cable back to my amp with minimal signal loss.
- Keeley 4-knob Compressor. Anyone looking into boutique effect pedals knows about Keeley. They make amazing equipment. This compressor is astonishingly transparent. I also have a fantastic Keeley-modded wah pedal, but it doesn’t fit on this board.
- Way Huge Pork Loin. Of the countless “tube screamer” clones out there, this one is my current favorite. Being able to dial in the original clean signal is very nice.
- ZVex Box of Rock. This box advertises itself as a “Marshall Stack in a box”. It’s certainly lighter than a Marshall Stack.
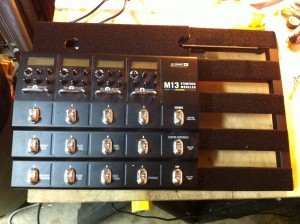
- Line6 M13. This is the backbone of my effects matrix onstage. The M13 is a great-sounding all-around pedalboard. I have a number of wish list modifications for Line6 (USB, editor GUI, size concerns) but at the moment it’s the best overall multi-effect unit I have found.
- Mission Control EP1-L6 Controller. Mission Control makes great controllers. This one looks and feels like a Crybaby wah, but it’s actually a continuous controller for the Line6 M13. I can use it as a wah, or to sweep between points on the effects processors.
- Morley Mini Volume Pedal. This is an optical volume pedal and happens to be the smallest good-quality volume pedal that I can find.
- Power Strip
- 1 Spot power supply.
- George L cables and connectors
- Switchcraft right-angle plugs
Signal Chain
Input (wired / wireless) -> buffer -> Keeley compressor -> Pork Loin -> Box Of Rock -> M13 -> Morley Volume Pedal -> buffer -> amp

Inside the custom switch interface

The Line6 M13 occupies a substantial area on the pedalboard

Fully loaded and wired
The (recent) history of my pedalboard
This is the third (!) complete teardown and reconfiguration of my pedalboard in the past year, but I think this one is going to stick around for while. My “big” board was based on the PedalTrain PT-Pro. At 16 x 32 inches it had more than enough room for all my pedals but was too big and too heavy – especially in its flight case. The “small” board was based on the PedalTrain PT-2 which 16 x 12.5 inches. I’ve been using this one for most of the past year. It has just enough room for the Line6 M13, the Mission Control pedal, Morley Mini Volume pedal, and the Line6 G50 receiver. I’ve been wanting to add a few boutique pedals to layout but didn’t have the room on the previous board. The PT-3 accommodates these extra pedals and still fits inside the flight case that came with my PT-2. This leaves me with a PT-2 and the soft carry bag that came with the PT-3, which should be easy to sell.
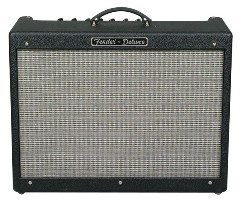
 In a previous post I mentioned that I intended to make some improvements to one of my guitar amps. I have had my Fender Hot Rod Deluxe for years and it’s been a great workhorse amp. Among my general observations of this amp:
The stock speaker is fairly flat sounding. It lacks dimensionality and punch.
I only use the clean and “yellow” lead channels. The “red” lead channel is useless to me. It has far too much gain and makes the amp sound fizzy and over-distorted.
The amp breaks up into distortion far too early in the gain stage. I want it to be louder and cleaner.
The amp has been retubed and rebiased ever few years, but it never seemed to address my gripes. I’ve discussed my wish list with a number of shop technicians and came to the conclusion that I needed to make some changes to the amp in order to tailor it more closely to my needs. I decided to switch brands of tubes from the stock Groove Tubes to JJ Tubes. Their sales tech was very helpful in tailoring the tubes to my needs. Here is what we decided to go with:
- ECC81 ( 12AT7 ) in V1.
- ECC832S in V2. This is a hybrid tube that is an ECC83S ( 12AX7 ) on one side and an ECC82 ( 12AU7 ) on the other side. Essentially this will drop the gain in both the clean and drive channels and increase the headroom.
- ECC83S for the phase splitter.
The next big improvement was installing a Weber Ceramic Chicago 12 speaker in place of the stock Eminence 12. This process was actually pretty involved. I had to remove the back panel of the amp, pull the amp chassis, remove the stock speaker, install the new speaker and re-assemble the entire amp. It took about an hour to do all this, but fortunately I had a great hockey game on TV to watch while I was doing the work. The Chicago 12 speaker is pretty stiff and dark sounding until it’s broken in. I had Weber perform about a week of initial break-in, and I expect that it’ll take a few months of regular gigging / rehearsing to really bring out the full tone of the speaker.
So, after those modifications… the amp sounds MUCH better. First off: the tubes made a huge difference in the overall tone. It seems bigger, warmer and cleaner. That pesky “red” lead channel is actually usable and great sounding; it has the nice bluesy grit I associate with vintage Fender amps. With the addition of the new speaker, the amp’s voice seems bolder and cleaner. I think it’s delivering higher volume due to the speaker’s efficiency. Definitely a big improvement across the board. I’m really looking forward to hearing how this amp performs at upcoming gigs.
 On Saturday 6/18 The Dudley Manlove Quartet played at the Sunset Tavern in Ballard. Our keyboard player Chris Joss opened the show with his accordion stylings, much to the enjoyment of the appreciative audience. We hit the stage and kicked into our regular set. We had a fantastically great show and the sold-out room was enthusiastically dancing all night. I had two minor gear gripes…


