Archive for the ‘Music Equipment’ Category

Rehearsing for BowieVision

January 23, 2014 by John No Comments »

Over the past few weeks the members of BowieVision have been working hard to polish our arrangements for the upcoming shows. We have a number of new songs being added for these performances and I’ve continued to refine my tones as I pay tribute to Bowie’s very talented guitarists.

For most of the songs I’m still using the black stratocaster, but the Les Paul goldtop is also being called into action. The combination of the P90 pickups and chambered body gives me a nicely balanced tone for Mick Ronson’s guitar parts. The strat provides a tighter sound that helps situate it in the more dense mixes for songs like “Fame”. Overall, my signal path is pretty simple: Pork Loin + 168 ms delay + reverb. The most complex signal chain for any song in our current set list is “Fashion”, where I am recreating Robert Fripp’s huge guitar sound with the Wampler Sovereign + pitch change (for solos) + delay + Strymon Lex + reverb. Mr. Fripp produces a frantic, angular sound and it’s challenging for me to fill those big shoes!

I’m looking forward to the show on Friday 1/24 in Tacoma, at the Swiss Tavern. In my years with Jumbalassy we performed there regularly and it always was a great venue for us. We’ll also be performing on Friday 2/14 in Seattle at the Crocodile. Come on out to one of these shows and join us!


Pondering The Rig

November 8, 2013 by John No Comments »

My existing live performance setup is very good. I use a combination of great instruments, boutique pedals, a central multi-effect unit and a fabulous tube amp. I’ve been very satisfied with the tone and versatility of my rig, but it has some factors that make it challenging:

  • No presets for my boutique pedals. The only device in my system with any notion of “remembering” an effect setting is my Line6 M9. It does a great job of being the central nervous system of my pedalboard. Nothing else of my board has a preset mechanism, so making significant changes on the fly is limited.
  • No computer-based editor for anything. I would love to have an editor / librarian system for my effects and preset management. Back when I had the Line6 Pod Pro, I used its GUI software on my laptop to manage presets. I sure miss that!
  • Size and weight. My system is just about as small as I can make it, given my current requirements.

I have been considering the possibility of going to a fully modeled system, based around a central effect / amp modeling unit such as the Line6 Pod Pro HD X or the Fractal Audio Axe FXII. This would feed into a full-range flat response amplified speaker that would replace my tube amp. This type of setup would certainly address the issues I’ve outlined above, and it also gives me a single highly flexible system for guitar, bass and Warr guitar.

The challenge in this type of setup is selecting the appropriate modeler and foot controller, then completely recreating all of my tones. I have used Line6 equipment for over a decade and their newest lineup of gear is impressive; I’d say they have the front runner position based on my historic level of satisfaction with the company and their products. I have read a lot of testimonials from Axe FXII users and I’m impressed by what I’ve heard, but at 4x the price I’m uncertain of the value proposition. The next step in my investigation will involve some A/B testing. Stay tuned for details…


The Black Strat : Faster, Better, Stronger!

August 2, 2013 by John No Comments »

black strat reborn

The Black Strat

We began our association over 20 years ago when I found it hanging on the wall of a local used guitar store. This is a late 80’s production model “Strat Ultra” with an ebony fretboard, staggered locking Sperzel tuners, 2-point fulcrum tremolo, and Wilkinsen roller nut. It’s also not entirely black… if you ever see this guitar in bright stage lighting you’ll notice it’s actually black with a pearl green clearcoat. According to my contact at Fender, there are a number of aspects about this guitar that are non-standard for the model, which suggests it was probably assembled in the “Fender custom shop” as a one-off customer order.

I knew this guitar was unusually good when I first picked it up. At that point it already had some fret wear and few dings and scratches. I immediately bonded with it and purchased it on the spot. The only significant change I made to this instrument was replacing the original electronics / pickguard. It had Fender “lace sensors” on it, with a humbucker in the bridge position. The replacement pickguard is the same black pearl finish, but is outfitted with Fralin blues pickups with a bass plate under the bridge.

Over the past 20+ years I’ve played this guitar for thousands of performances. We’ve had many adventures and covered a lot of miles together… it’s been my primary guitar for live shows, recordings, practicing, touring and teaching. I would estimate I’ve played at least ten thousand hours on this guitar! That’s a lot of wear on an instrument and on a lesser-quality guitar that toll can be irreparable. Earlier this year I finally had to accept the fact that the frets were very worn, the bridge saddle set screws were a mess, the string spacing was incorrect, and the sum result was a guitar with so many high-mileage idiosyncrasies that I was the only person capable of playing it. It was time for this guitar to see a doctor for significant work.

The only person I was willing to entrust this guitar to is Mike Lull. If you live in the Pacific Northwest, you know who he is. He’s not cheap, but as my friend Kris Geren says about guitar repair, “if you love it, send it to Lull”. Mike has worked on other guitars for me, including my strats, teles, and even my Warr Guitar.

The first thing Mike said upon looking at this guitar was that it should have been refretted a while ago. See? I told you nobody else could play it 🙂 He was right. The frets were very worn and rutted, and pretty uneven. We discussed options and I played several guitars in his shop to select the gauge and material for the new frets. Fortunately, the ebony fretboard was in very good condition and only minor resurfacing was needed. I gave Mike a list of additional work to do (see below) and we shook on it. Handing off my primary guitar for triple-bypass surgery gave me a few jitters, but I knew it was in good hands.

Two weeks later I picked up my reborn instrument. Here is the rundown on what was done:

  • Refret with medium-jumbo stainless steel frets
  • Plek treatment
  • Replacement of rusty / corroded pickguard screws with stainless steel screws
  • Grinding of the height-adjustment hex screws for the bridge saddles
  • Complete setup

The instrument is MUCH different than before. Focusing on the most obvious (and expensive) element, it has new frets. The stainless steel frets are beautiful, shiny and smooth. They’re perfectly crowned and tuned. They’ll last forever and never corrode. Mike tightened up the neck/body connection and completely set up the instrument.

I haven’t played a show with it yet, but my initial reactions are

  • WOW. This guitar is beautiful. The entire instrument just goes together so beautifully and plays so sweetly.
  • It resonates and sustains like a boutique guitar should. It vibrates freely and evenly all along the entire neck.
  • There is a newfound clarity in chords, especially in that tricky area in the first five frets. Fender guitars are notoriously out of tune between the third and seventh frets. This is a topic for a much longer blog post, but on the black strat the frets have been Plek’d , which has largely eliminated those issues.

This guitar was nowhere near this good when it rolled off the bench brand new. It has always been a fine instrument, but with this work completed it has become exceptionally great. This kind of transformation isn’t cheap… the shop bill for this work totaled more than I paid for the guitar! I have a few other guitars (ahem), and several of them were significantly more expensive than this one. Even my super-boutique-y Eric Johnson signature strat is relegated to backup status at gigs. That’s how special this black strat is to me. Having it achieve such a state of near-perfection is a beautiful thing.


Split Brain – Playing 2 Parts At Once

July 18, 2013 by John No Comments »

In just a little under a month, The Dudley Manlove Quartet will take the stage at the Triple Door in Seattle for a fun night of music. I’ve been going back to listen to some of our songs to make adjustments to my guitar arrangements, especially where I’m covering two simultaneous parts. It’s an interesting process of deconstruction to take multiple parts and attempt to coalesce them into something that a single guitarist could perform.

In Jumbalassy, I experimented with covering multiple guitar parts by using a digital delay. In reggae songs there are usually a few separate distinctive parts:

  • The “skank”, a partially muted chord occurring on 2 and 4 in the measure
  • A rhythmic line providing interplay

These occur at the same time so there wasn’t a practical means of simultaneously recreating that effect as a lone guitarist. My solution involved a hall of mirrors: I’d tap the tempo into the delay using quarter-notes and set the delay for a whole note so it would take a full measure and repeat it once, remaining locked to the tempo of the song. Then it was just a matter of switching between the parts each measure… I’d play the skank one measure, then let the delay repeat it while I played the rhythmic picking part, then switch back the the skank while the other part repeated. It actually worked pretty well as long as the song didn’t have very complex chord changes. 

In DMQ I can’t get away with that kind of approach because the songs have complex arrangements and the guitar parts have significantly different timbres. It means my approach to layering the sounds has to be more of a compromise between the two parts, and sometimes requires a little technical trickery… one of my Stratocasters has a factory-installed Roland hexaphonic synth pickup system. I use it to drive a guitar synthesizer but one of the sneaky side-benefits of that system is that I can map different sounds to specific strings or zones on the fretboard. Again, it requires a careful arrangement of the parts to ensure I’m triggering the appropriate sounds.

The most challenging approach to this is in playing Warr Guitar, where my hands are independently performing on their own sides of the fretboard. It’s much harder for me to play this way. It might be due the fact that I never played piano with much facility, and I believe that type of hand independence would translate nicely to Warr Guitar. It takes me a bit of time to work out my parts on this instrument, but it’s very rewarding and fun. I’ve been considering using this instrument in the Dudley Manlove Quartet when we perform Depeche Mode songs; since I can independently route the signal paths for the two sides of the  instrument I could double the bass line and trigger a synth line at the same time.

In an upcoming post I’ll detail some of the songs that will involve a split-brain approach and discuss my approach to performing them.


Pedalboard Rebuild – May 2012

May 8, 2012 by John 6 Comments »

Over the past week I’ve completed another full rebuild of my guitar pedalboard. This seems to be a once-every-18-months activity for me. Like Sisyphus, I have an endless repetitive task, all in the eternal quest for tone. I’ve been planning for this rebuild for a few months, and have been purchasing some new pedals. Given that I had a week without gigs, this seemed like an opportune time to commence the project and it gave me incentive to have it completed before beginning a new week of rehearsals.

Materials
PedalTrain PT-3 pedalboard with flight case. I have been using PedalTrain boards for a number of years. They are well-designed, lighweight and very road-worthy.
VoodooLab PedalPower 2+ power supply. This power supply has eight isolated circuits that provide power to pedals. It is an industry standard. PedalTrain supplies brackets with each of their boards, making it very easy to mount this power supply underneath. I actually needed more than eight power feeds, so I soldered up a little splitter to provide 9v to two pedals from one of the circuits; ordinarily I’d be concerned about interference between the audio circuits. In this case there isn’t audio involved; the split circuit is feeding switch / control boxes with LED indicators.
Mission Engineering VM1 (version 2) volume pedal. I have a few pedals from Mission Engineering. This one is really pretty straight-forward as a volume pedal, but it also includes a tuner output and a switch (in toe-down position) that mutes the primary output for silent tuning. I don’t use the tuner output because this volume pedal is placed last in my signal chain; my tuner is actually at the front of my signal chain so I can tune without having to turn off effects.

    • Sonic Research ST-200 strobe tuner. This was a recommendation from a friend. It’s a small and well-designed strobe tuner pedal that fits nicely on my board. I also have a Peterson StroboStromp2 tuner pedal but it’s quite a bit larger so it now resides in my music room.
    • TC Electronic Trinity reverb pedal. TC Electronic reverb is beautiful and hugely dimensional. This little pedal is based on their “Hall of Fame” reverb, but has 2 additional presets. It is exclusively available via ProGuitarShop in Portland. This is a great store and I recommend you visit them online or in person.
    • Xotic Effects EP booster pedal. This pedal emulates the preamp section of the Echoplex EP-3.
    • Line6 G50 wireless receiver
    • Line6 M9 multi effects pedal
    • Dunlop Crybaby wah pedal – modified by Robert Keeley with the “Mello Wah / all mods” options.
    • Way Huge Pork Loin overdrive pedal. This pedal falls into the same family of overdrives as the Tube Screamer or Sparkle Drive. It adds the right amount of grit and has a very useful blend function that dials in some of the clean tone for balance.
    • Zvez Box of Rock distortion pedal. This pedal is designed to emulate the one of a cranked Marshall stack. It has a separate boost section that can be kicked in, which I rarely use.
    • Keeley 4-knob compressor. This compressor pedal is so clean and transparent that it’s difficult to detect in use. It can be dialed in for a very dramatic “squish” tone if desired, but I use the optical compressor model in the M9 to get that heavy compression setting. The Keeley compressor is something I tap for a little more body in single-note bluesy solos.
    • Switch Doctor channel switch for my Mesa/Boogie Lonestar. This is smaller than the stock Boogie footswitch and fits on my board much more easily. The two-button switch allows channel and boost selection. The Lonestar has two channels and I usually set up the lead channel with a little bit of drive, using the “tweed” option for the channel voice. The amp also has a built-in solo boost that can be remotely activated; I rarely use it, but occasionally it’s helpful to have a little extra wallop.
    • Expression pedal switch box. This is a pedal that I designed and built myself. I purchased the components from Pedal Parts Plus and did the wiring myself. The Line6 M9 and M13 effect processors have two inputs for expression pedals. These inputs accept continuous controller pedals that provide a swept range from infinite resistance to 10K ohms. I wanted to have the functionality of switching between two parameter settings on a single effect, so I designed this simple circuit with a 3PDT footswitch to alternate between a dead short (ground and tip are directly connected) and 10K (provided by a 10K resistor), while turning on an LED for the 10K setting to indicate which position the switch is in. I built two of these circuits side by side in a small pedal enclosure. One of the footswitches is a momentary switch, handy for effects like my Leslie emulator; the rotation speed defaults to the slower setting but when I step down on this switch it speeds up to the higher setting, and releasing the switch spins it back down. Because the switch is momentary it’s much easier to manage effect settings that are frequently changed (I don’t need to click it down, let up, then click it again to reset to the original setting). I also use it for special effects that only are necessary for short phrases.


  • Interface box. Another one I designed and built this one myself, using parts purchased from Pedal Parts Plus. The drilling and wiring was a challenge on this one because I wanted to use a small enclosure for it. It has a total of ten holes drilled in it: seven 1/4″ jacks, a DC input jack, a 3PDT footswitch and an LED. More information on this box in a moment…


The Build Process
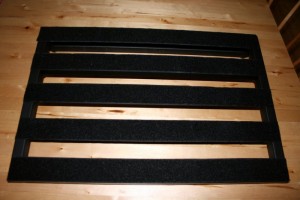
BARE BOARD

The first step was to remove everything from the existing pedalboard. I’m reusing my trusty PT-3 so this project began by pulling off all the effects pedals, clipping the ties that bundled all the cables, and separating everything into little piles. My previous pedalboard configuration was largely dominated by my Line6 M13. In this new setup I’ll be using more individual effects, and it’ll also require a different power supply for all those pedals (see below for more specifics).

I always do a total de-lousing process when the pedalboard is stripped like this, so after some time with the shop vac I wipe down the entire board with alcohol to thoroughly clean it. Remember: pedalboards live on bar stages, which are infested with disgusting infectious things, such as musicians. Also, it seems like about once a year someone leans over onto the stage to tell me something and in the process gives my pedalboard a sip of their drink. Removing the sticky residue helps keep my toys clean.
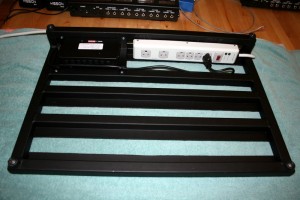
 

POWER

Step two is mounting the new power supply. There are many choices for a pedal power supply, but I’m partial to the VoodooLab Pedal Power 2+ since it has eight isolated power feeds for stable, regulated 9v output. Mounting the power supply under a PedalTrain board is very easy because the board ships with special brackets for this purpose. Once you mount the brackets on the power supply, it requires drilling four small holes into the pedalboard frame, and using the supplied self-tapping screws to finish the job. On the PT-3 board there isn’t a specific place along the back of the board where you are required to mount the power supply, so I moved it all the way to one side to leave space for the power strip which was necessary because two of my devices (Line6 M9 and Line6 G50 wireless receiver) have their own special transformers. The power strip acts as the main AC supply for the entire pedalboard, so the only thing shown plugged into it here is the Pedal Power 2+. However, it’ll have other things plugged into it once I start mounting pedals.
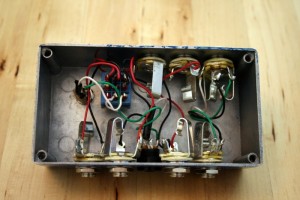
INTERFACE BOX

I like to have a single interface box where my pedalboard can be patched to the wired guitar input and various connections to the amp. It’s much easier to have these jacks in a box at the edge of the board, and saves wear on the effects jacks from repeated insertion and removal. For the rebuild of this board I had more connection points than before, so I took the opportunity to make a new interface pedal. It started with a blank enclosure and some very careful planning to get the jacks, switches, and LED all in places where they were on the correct sides of the box and still wouldn’t interfere with each other. Once it was all marked up, it took about 20 minutes with the drill press to get the holes drilled. I gave it a quick coat of enamel paint then did the assembly and soldering. It was a very tight fit, but everything works! The footswitch serves a simple purpose: switching between the wired and wireless guitar input signals. The LED is illuminated with the wireless feed is active. This might seem unnecessary, but it’s very helpful to know which signal is being fed downstream in the event something else isn’t working as expected.
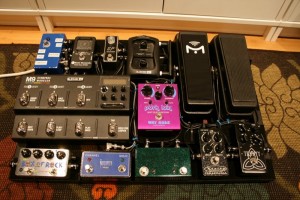
SETUP

Attaching the pedals to the board with velcro is pretty easy once you figure out where to put them. I usually start with Pedalboard Planner, a useful free online tool that can help you plan the layout of your board. It’s a handy tool but leaves out two important aspects of your board: the pedal height and the distance between pedals required for connectors. Because I use George L cables and connectors I know how much clearance to provide. When laying out this configuration I knew the two wah-shaped controllers would need slim-profile phone plugs in order to fit, so I soldered up four cables using slim connectors, attaching them to lengths of George L cable that I could trim and terminate once the board was laid out. In my initial plan for the board, I had intended to have the M9 at the front, with the Box of Rock and channel switch above it. But once I started to lay out the pedals I realized those two would be difficult to access given their height relative to the M9. As a result I switched the layout to put the Box of Rock and channel switch in front.
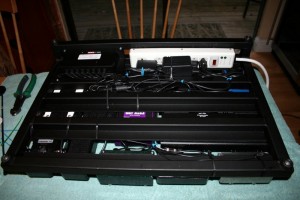
 

UNDERSIDE

Here is a shot of the underside of the board with everything in place and wired. I’m a bit of a neat freak when wiring things up, bundling cables together and using cable ties to keep things tidy. I don’t want any cables to get snagged or nicked, and wherever possible I keep the audio and power connections apart. One important piece of equipment that isn’t shown here is a butane BBQ lighter that I keep handy when using plastic cable ties… when you clip the long tail off a cable tie, it leaves sharp corners that will inevitably find a way to poke your fingers when you pick up the board; I use that BBQ lighter to melt the end of the clipped cable tie.

Also visible in this picture are the two power supplies for the Line6 devices. I had to leave space along the power strip for the inline transformer that powers the M9, which is attached next to the power strip with a couple of cable ties.
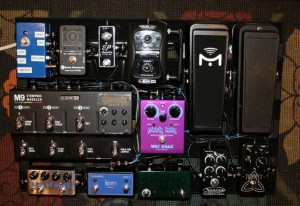
BOARD FROM ABOVE

This is a shot showing the top of the board with everything in place. This shot is very nearly top-down so it’s difficult to discern the relative heights of the objects on the board.

Note how the wires are neatly bundled and out of harm’s way. I also make sure to leave a little extra space near the edges so the plugs are somewhat protected. When the board is inside its flight case, I don’t want any of the connectors to be damaged in transit. Troubleshooting a problematic pedalboard onstage is a nightmarish proposition, so I always put a lot of effort into testing every cable, plug and connection before assembly. Once the board is wired up, I do some jostle-testing on each connector to ensure everything is really solid and noise-free.

On first power-up I was rewarded with something beautiful: silence. The amp wasn’t producing any buzzing or humming of any kind. Once I started playing and stomping on pedals it was plenty louder in my music room 🙂 But it’s very satisfying to have the board generating zero background noise of its own.
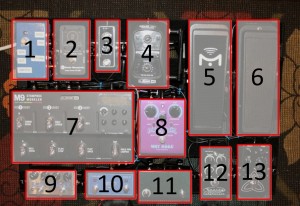
ID GUIDE

Here’s a handy guide to the items on top of the board:
(1) Interface box (2) Sonic Research ST-200 (3) Xotic Effects EP Booster (4) Line6 G50 receiver (5) Mission Engineering VM1 (6) Dunlop Crybaby (7) Line6 M9 (8) Way Huge Pork Loin (9) Zvex Box of Rock (10) Switch Doctor amp channel switch (11) Expression pedal (12) Keeley compressor (13) TC Electronic Trinity.

The signal chain goes thusly: guitar (either via wired or wireless input) -> interface box -> Sonic Research ST-200 -> Xotic Effects EP booster -> Keeley Compressor -> Dunlop Crybaby -> Way Huge Pork Loin -> Zvex Box of Rock  -> Line6 M9 -> TC Electronic Trinity -> interface box ->amp

Update: Once I had a chance to run the board through its paces at rehearsals and a gig, I realized that the placement of the Line6 M9 was problematic in the sense that the pedals in front of it were taller than the front of the M9. It meant for some awkward gymnastics to access that device. The solution was pretty simple. My pedalboard is manufactured by PedalTrain, and they have an accessory called a “pedal booster” that adds a little extra height to make pedals easier to access. The M9 fits perfectly on the large version of the pedal booster, and neatly solved the problem.

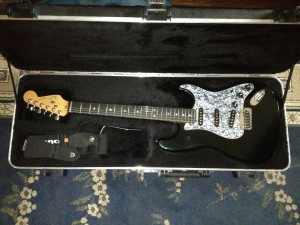


Boogie Lonestar

September 12, 2011 by John 1 Comment »

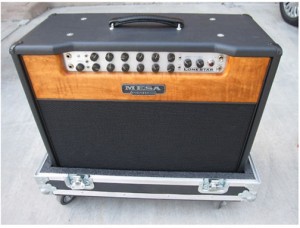
About a month ago I sold my Fender Twin and purchased a Mesa Boogie Lonestar 1×12 to replace it. The Twin is a great amp and produces a classic tone. My decision to switch to the Lonestar was prompted by hearing the great tones the amp produces, and by my interest in getting a better blues tone. The Lonestar has two channels, “clean” and “drive”. Each channel can be set to 100 watts using a solid state rectifier, or 50 watts using tube / solid state (switchable) rectifier. The overall reverb level for each channel is assignable and there is a programmable boost function for solos.

Overall the amp produces a fantastic clean tone with deep dimensionality and lovely coverage. It has a pure 1:1 response for input dynamics, which is unlike the Twin with its natural compression. It was easy to get a beautiful clean sound out the amp, and to get a classic driven blues tone from the lean channel. On-stage coverage is amazing from this amp. For a single 12 inch speaker it has surprisingly broad spread. I’m pretty pleased so far and look forward to putting this amp through its paces at upcoming gigs.


Thoughts On The 7/21 Dudley Manlove Quartet Performance

July 25, 2011 by John No Comments »

On Thursday 7/21, The Dudley Manlove Quartet performed an outdoor show at Alderwood Mall in Lynnwood. This is both an unusual weekday evening for us to perform, and an unusual venue. The stage was outdoors near the South side of the mall, situated on patio that is sloped to help water drain away from the mall entrance. As a result, everything on the stage had a peculiar forward lean. I arrived early to scout the performance area. Once I was set up I ran through some scales to warm up. A few young skaters wandered by and one of them yelled “IRON MAN!” which I happily obliged him by playing. I found him later and asked why he had requested that song. His response: “because Ozzy fricking rules!”  Difficult logic to refute.


Once the rest of the band arrived we were set up and ready for action pretty quickly. It was a bit chilly playing outdoors. One might expect a late-July outdoor gig to be warm, but this *is* the Pacific Northwest. It’s a bit of a challenge to keep a guitar in tune when it’s cold outdoors, and I had to tune a few times each set as the instrument reached a stable temperature. This is the second gig we’ve done since I pulled the buffer pedal from my pedalboard. I expected it would provide a quiet signal boost but it seems to be injecting significant RFI into my signal path… it sounds like I’m getting a radio signal. I haven’t attempted to troubleshoot the device and it’s currently sitting on the bench in my garage. Since removing it I’ve noticed my rig is much quieter.


I’m still on the hunt for a Boogie Lonestar, but the Fender is doing a great job of delivering the goods. Overall, another successful outing for the band, and certainly a memorable one as mall gigs go…


Hot Rod Deluxe : Tune Up Time

April 25, 2011 by John No Comments »

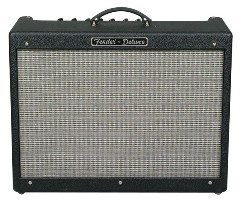
Over the years that I’ve owned my Fender Hot Rod Deluxe, it’s seen a lot of stage and studio time. I don’t remember exactly when I got this amp; it must have been at least five or six years ago. In general it’s always been a solid performer with a few minor personality quirks: (1) the “red” gain channel is ridiculously overdriven and musically unusable (2) the amp breaks up far too early in the gain stage and (3) the stock speaker sounds like a ham sandwich.

A few years ago I experienced the most common of HRD ailments: the all-too-common cold solder issue with the 5W resistors (#R58 and #R59 on the PCB). It manifests itself as random channel switching and reverb switching. This is typically repaired by simply re-soldering the errant connections, but my local shop tech also added jumpers to help alleviate the overheating on these traces.

The first step for this amp will be a full retube. I have ordered a set of JJ tubes:

  • ECC81 ( 12AT7 ) in V1.
  • ECC832S in V2. This is a hybrid tube that is an ECC83S ( 12AX7 ) on one side and an ECC82 ( 12AU7 ) on the other side.  Essentially this will drop the gain in both the clean and drive channels and increase the headroom.
  • ECC83S for the phase splitter.

I’ll install the tubes and fully rebias the amp. Then I’ll install a new speaker. I’ve ordered a Weber Chicago 12 which I’m told is a very nice vintage-sounding speaker with lots of clean headroom. Once the speaker arrives I expect the amp to have a significantly improved clean voice. A post-upgrade report will follow…


The Twin Report

February 15, 2011 by John No Comments »

In a previous post I outlined the need for some maintenance on my Fender 65 Twin Reissue. This amp is the workhorse for my gigs with The Dudley Manlove Quartet. Over the past year I’ve noticed that the tone seemed less dimensional than before, and that I seemed to be lacking clean headroom at gigs. I bought this amp used and had a simple shop inspection as part of the purchase.

I recently discovered there is a great electronic repair shop right in my home town of Burien, which is much more convenient that driving all the way into North Seattle for routine service. The shop tech and I discussed the work I wanted done, and he really did a nice job. All of the tube sockets needed tightening and cleaning, as did the jacks in the amp chassis. Once this was completed the entire chassis was inspected, and then the amp was completely retubed with new Groove Tubes.

The first post-spa gig was Saturday 2/12 at the Tulalip Casino. This is a big stage and gives me an opportunity to really check out the sound of the amp. It sounded much better than before. There is a lot of warmth and big tone that was not present before the tune up. I know the power tubes were previously mismatched, and I suspected the preamp tubes might have been getting pretty tired. The sound of the freshly retubed and tuned amp is inspiring, and I look forward to many years of using this amp. Based on the recommendation of my tech, I’ll probably do a full retube every three years on this unit from now on.


Next Generation POD : My Wish List

February 12, 2010 by john No Comments »

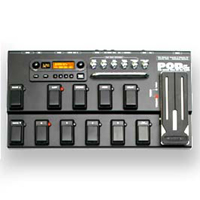
Pod XT LiveI admit that I’m one of those users who modifies gear and is always wishing there was just one more feature aboard… and as such I provide feedback to most of my gear manufacturers. One of the mainstays on my pedalboard is the Line6 POD XTLive, which I’ve had for a number of years and like reasonably well. I haven’t upgraded to the X3Live because it didn’t seem like a justifiable expense for the feature set.

But if Line6 were to build a new POD to my specs, I’d be the first guy to buy it. Here is the list of features it should have in my shiny imagination:

  • Make this unit physically smaller. It’s too large and heavy considering what it does. I’d like to see the unit scaled down by at least 1/3. Make it the same size as the M9, but keep the expression pedal. Put the switches a little closer together. If this beastie occupied less space on my pedalboard I’d be much happier.
  • Get rid of the plastic stomp switches and replace them with standard metal switches. These should be lit when active.
  • The small LCD is fine for displaying multiple lines of text. I’d like to see an additional readout that is visible from eye level on stage. It should be capable of displaying at least 8 characters of text at 1″ tall.
  • Get rid of the external transformer and put this inside the unit. I know this seems counter to my first request of making it smaller. It should be possible put the transformer inside the unit and having a standard IEC power cord.
  • Make the pertinent button labels backlit from inside the unit. If this is impractical (uh, how much can an LED cost?), how about allowing the USB connector on the back of the unit to power a laptop LED gooseneck light? That way we can see our pedalboards on dark stages. Another benefit of having a powered USB port: you could plug in your iPhone charger right into your pedalboard. I frequently charge my phone between soundcheck and the gig, and this would be a simple way to do it.
  • Get rid of MIDI on this unit. In fact, let’s get rid of MIDI entirely on everything. USB  for the win! It’s bidirectional, faster, and more reliable / stable. MIDI is akin to the telegraph. It served its purpose when the buffalo still roamed. But it’s the year 2010, and while we didn’t get those cool jetpacks as promised (dammit!) we can at least embrace USB and allow our music toys to gracefully daisy-chain.
  • Include a physical docking space where the Line6 wireless receiver can be integrated right into the unit and powered interally. Or just build this in. The Line6 wireless systems are great. I love mine. Build it right into the unit please.
  • Wanna get REAL crazy? Let’s put Bluetooth capabilities into this system and build a small Bluetooth retrofit for guitars. I’d love to control patch changes wirelessly by turning a knob or pressing a button on my guitar. Or put the transmitter on my guitar strap, right on the wireless unit I’m already using!

Hey Line6, if you use my ideas you owe me a beer. And one of these new units. And a pony.